

How To Repair Tubeless Bike Tire
How to Set up a Flat Tire | Tubeless
with JESSICA BROUSSEAU, Pro Mechanic for Liv Racing
It's pretty rare to get a apartment tire when you have a tubeless setup. The sealant within your tires will quickly seal small holes and cuts to keep you rolling on the road or trail. Notwithstanding, flats are always possible – even with tubeless. Whether you've discovered your tire is flat afterward storing it in the garage, or you lose pressure after a sudden impact with a stone, we have you covered with the tips you need. Cheque out our guide to fixing your tubeless flat and getting back out on your ride.
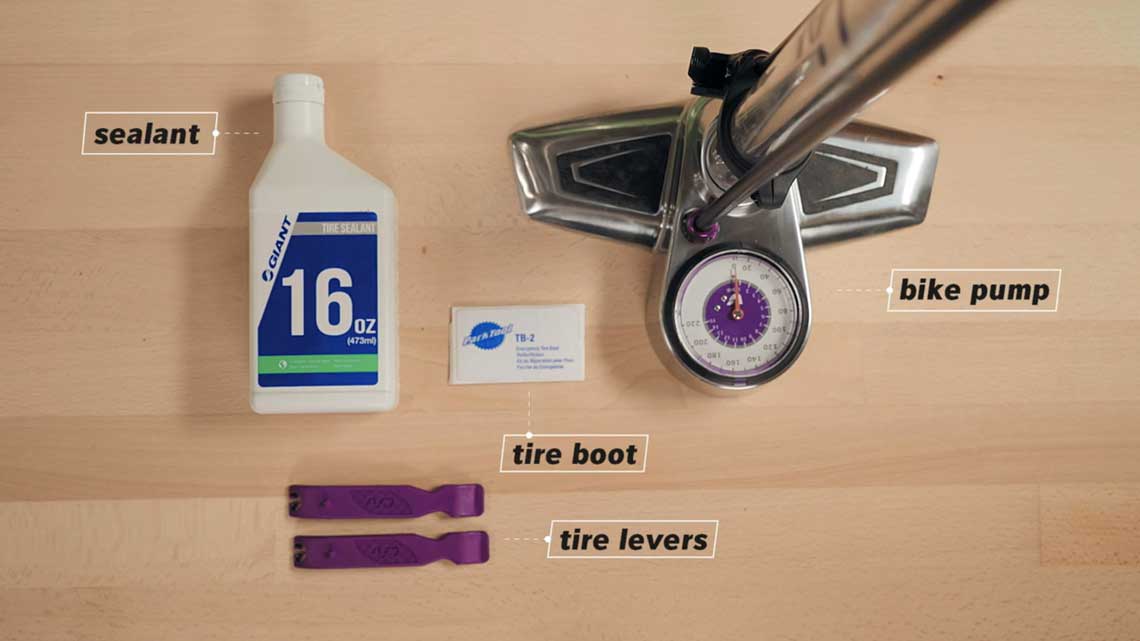
What Yous'll Need
- Sealant
- Tire Levers
- Pump and/or CO2 with a valve
- Textile or rag
You likewise might demand:
- Tire boot
- Tire plugs
- Rim tape
- A tube (just in case!)
- Multi-tool (to remove your axle on some bikes)
Step by footstep guide to fixing a tubeless flat:
- Pull over to a safe place on the side of the road or trail.
- For tubeless mountain bike tires, first check to meet if there is a small-scale hole in your tire before removing it. If you accept tire plugs, you lot tin set up your flat quickly without removing your wheel or tire. Check out this video to learn how to use tire plugs.
- Shift! If you have a rear flat, shift into the smallest ring on your cassette. This volition make the chain loose and volition ensure your cycle is easy to remove and reinstall. If you have rim brakes, spread your brake pads past removing the cablevision tension or flipping the lever. If you are fixing a apartment mid ride instead of at home, you can flip your bike upside down to remove the bicycle(southward). If you're worried about scrapes or scuffs on your handlebar tape and saddle, find a grassy area or ride with a rag in your bailiwick of jersey pocket. If you lot ride a mountain bike with hydraulic disc brakes, you might be worried almost air finding its way into your brake lines. Usually, this is just an result if you store your bike upside down for long periods of fourth dimension.
- Remove the wheel from the cycle. Remember, each wheel can be dissimilar. We recommend practicing removing both your front and rear wheel from your bike so you are prepared when yous get a flat. Generally speaking, the rear is always the wheel that gives you trouble. If yous make certain you shift into the smallest ring on the cassette, information technology should brand this easier. And then, remove the axle or loosen the quick release (but don't remove the nut!), pull the derailleur dorsum and out of the way, and pull your cycle directly up and out of the dropouts.
- Remove the bead of your tire from the rim. For tubeless setups, this can be difficult. Squeeze hard on the tire and pull it away from the rim. Exercise this on both sides. Wiggle the tire dorsum and forth to piece of work the tire into the center of the rim will brand information technology easier to remove the tire. Also, make sure all the air is out of the tire.
- Using the "spoon"-shaped end of the tire lever, pull the tire bead up and away from the bicycle rim. Use the hook at the finish of the lever and claw it to the spoke of the wheel.
- Using the second tire lever, insert the "scoop" terminate nether the bead of the tire near the outset tire lever you inserted. Pushing frontwards or pulling toward you, remove i side of the tire completely from the rim. (Y'all may besides do this with just one tire lever)
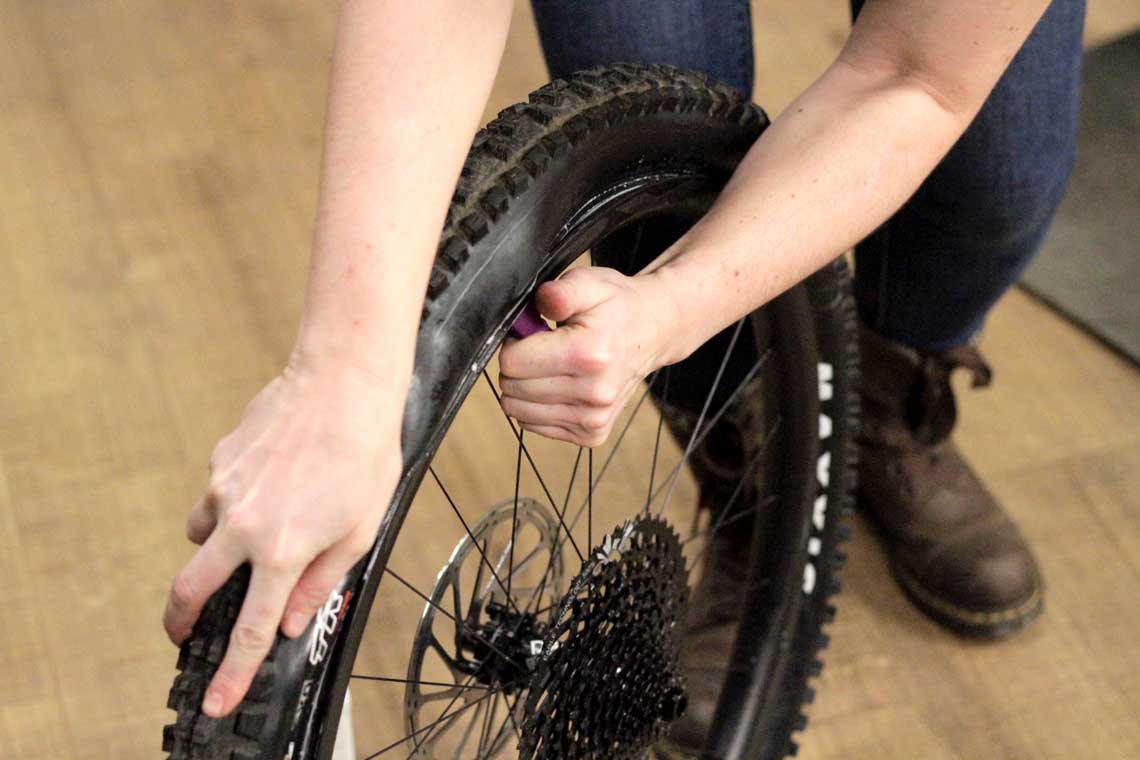
PRO TIP: Opt for plastic tire levers over metallic ones. They won't scratch the surface of your rim and they are lighter and easier to conduct!
- Inspect the rim tape. Wipe down rim, checking to make sure the rim tape is intact with no holes. If there is a pigsty in the rim tape that is letting sealant and air through, y'all won't be able to fix the problem trail-side. Throw a tube in (learn more almost how to fix a flat tire with a tube HERE), and pedal home. When you get habitation, replace the rim tape. Learn more than about how to utilize rim tape Hither.
- Check the outside of the tire for holes and tears. Carefully run your fingers along the inside of the tire to check for gashes. Audit the knobs on the tread of the tire as well. If you find a large hole or gash in the tire that cannot be fixed with sealant lonely, you'll need to patch the tire and you might even need to install a tube until yous arrive habitation.
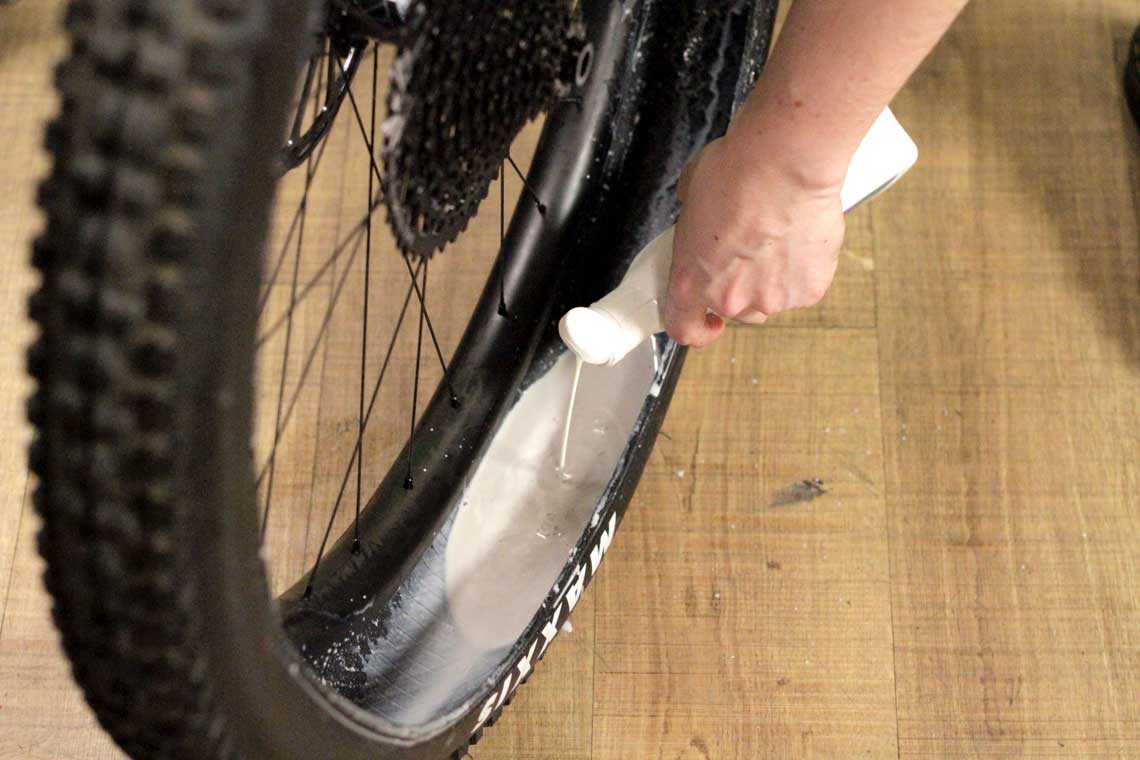
- If there is no damage to your rim tape or tire, add together more than sealant. Make sure y'all know how much sealant is required for your tires.
- Reinstall the tire on the rim. When you have most of the tire inserted into the rim, the concluding bit tin sometimes be a bit of a pain.
PRO TIP: If the terminal chip is super tight, start back at the top and use your hands to jerk the tire into the centre of the rim. Simply like you did at the beginning to loosen the dewdrop from the rim, this creates extra slack in the tire and will make it easier to get onto the rim. While you lot jerk the tire button down. When yous become to the bottom, y'all might be able to pop that tire on with your bare hands!
- If the tire is still a bit tight, catch your tire levers again and flip it over to push button the tire back onto the rim.
- Seeding a tubeless tire can sometimes exist difficult trail-side. Using a CO2 cartridge can help. If you are domicile and have a floor pump, try pumping quickly to inflate. The trick is to keep pumping until you hear a "pop" which ways the tire has seeded into the rim.
- One time the tire is inflated, milkshake, bounciness and spin the wheel to ensure the sealant has coated the within of the tire. For more than tricks on tubeless setup check out our guide HERE.
- Reinstall your bicycle. If you lot got a front flat, that is pretty easy. If you are fixing a rear flat, this is usually where people get defenseless up. No need to worry! Merely retrieve, you already shifted into the smallest ring on your cassette, so that's where your chain should go. Besides, remember that your cassette goes betwixt the bondage. Then, just move your derailleur dorsum out of the way so your bike can settle into the rear dropouts. Replace the beam/ tighten your quick release skewer and you're adept to go!
- If y'all have rim brakes, don't forget to tighten the cable back down once your bicycle is in. Then, but give it a spin and squeeze your brake to brand sure everything works like it should. Nice job!

Source: https://www.liv-cycling.com/global/campaigns/how-to-fix-a-flat-tire-tubeless/25294
Posted by: guzmanwariuld.blogspot.com
0 Response to "How To Repair Tubeless Bike Tire"
Post a Comment